The fresh water tank has been sitting not hooked up in the back right side of the bus for over a year. Same with the grey-water tank mounted underneath. With so many systems (fresh and grey water, coolant, diesel/biodiesel, WVO, starting battery electrical, solar/house battery electrical) that are reliant on or effect each other, plus all the wood- and metal-work designs, it is no wonder that some of Edna’s systems come together bit by bit. As the benches come together, so does the frame for holding down the fresh water tank since it is also part of the benches. As I look into mounting the WVO tanks I built this summer (blog entry to come when finished), I realize I need to finish things with the grey-water tank as it is situated where it will be hard to access much once the WVO tanks are in.
So, with many systems and wood-/metal-work coming together, and with the desire to for myself and my guests to be as comfortable as we can be this winter, I decided to get the water system together.
A failed stainless-steel-counter-on-the-side-of-the-bus plan led me to the metal scrap yard in Arcata where I traded in that heavy piece of stainless, for a much thinner and lighter one in the form of a sink. I still had to pay $7 even though it probably weighed 4 or 6 times less. Either way, I knew I was going to have to modify the sink to fit one of that size in the bus. It’s a standard size single-basin sink (approx. 16 X 18 inch basin). Including the two-inch flange around the edges (four inches where the faucet mounts) it was 22 by 24 inches. The space I had to work with was only 20 by 24 inches. So, I took to the sink with my angle grinder with a cutting head.
I took off an inch from all sides except on the faucet side. On this side I merely bent the edge upward at a 90 degree angle (using clamps, angle iron, a table, a hammer, and a rubber mallet). Where I took off metal, it was where it slightly arched upward. Taking this off created a sink that looked and functioned almost exactly like an under-mount sink. The only difference was the edge that was bent up.
Because of the designated space, I decided to mount the sink sideways with the faucet on the woodstove side. This is what allowed me to fit such a big basin sink. Where the edge that was bent upwards butted up to the insulated panel that separated the sink from the woodstove, I put a piece of nicely bent copper. This covered the back of the insulated panel, as well as the bent up piece of the sink. I will probably seal this seam at some point too. This will keep any water from getting onto the insulated panel, or under the sink.
I have been piecing together a slew of miscellaneous plumbing parts over the past couple years, only vaguely knowing what I needed. As things came closer, and my sink was put in, I began to have more concrete ideas of what I needed. On my way south after Rootstalk Festival, I stopped in Eugene at Bring, a second-use building supply store. Even though their prices may seem a little high, they did have almost everything I was sure I’d need, as well as many things I thought only just might need.
Although the process wasn’t this simple, or as straight forward, here’s how the system is plumbed, how my thought pattern was, and how it all went putting it together:
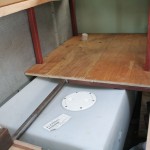
The freshwater tank is situated in the right rear of the bus. This is to help balance out the heavier left side of the bus, which is my kitchen, woodstove, storage, cabinets, and soon-to-be closet. It is inside the bus so that it wont freeze as easily in cold weather. To secure it, I screwed a piece of wood into the floor in front of it so it can’t go forward. On one side there is the wall. On the other side are metal supports for the storage/bench system. To hold it down, I built a frame out of 3/4 inch steel square tubing that was left over from my second iteration of a bed. In place, and on top of a wool blanket, I tacked the metal together. I finished welding it outside the bus. This metal frame bolts to the larger more robust frame of the storage/bench system. On this small frame I also cut plywood to make a platform. This will be the future home of my fully insulated cold storage. The constant (and usually cool) temperature of the water tank will help me keep foods like potatoes, eggs, teas, and home-canned goods for longer and help keep space in my fridge open.
Unfortunately my tank was plumbed with 3/8” bungs for all the drain/vent/supply lines, and a 1.25” for the fill. Because of where the fill was located, I decided to buy a kit that allowed me to relocate my fill. It came with a 1.5” through hull fitting for the fill, and an access panel that allowed you to install the fitting. The salvaged marine fill flange that mounts on the outside of the bus was also made for 1.5” hose. The only problem here was that most RV supply places only carry up to 1.25” hose, as that is a standard. So I had to specially order 1.5” marine potable water hose. Silly. For the 3/8” bungs, I had to make due with some fittings to adapt from 3/8” to ½”, which all of my lines are.
To fill the tank, one must use a hose, which can be ran to rear of the bus. The fill flange needs a special tool that marine fill flanges use, so no one can put anything in my water tank unless they have that tool. Here you can fill it with any pressurized hose. For the times I am filling from mountain streams (like at Mt. Shasta), I have a special 12v water pump that I will attach to a hose with a pre-filter. One can also fill the water through the access panel on the top of the tank, under the bench inside the bus. This is useful if I have to fill from 5-gallon carboys and such.
All of the lines are PEX (a leftover gift from a friend’s project). I sprang for a PEX cinch tool (which uses the stainless cinching hose clamps). It was about the same as a crimp tool (which uses the copper rings), but seemed a little more versatile (it can do any size of PEX, whereas the crimp tool can only do one, unless you want to buy a more expensive kit). I do have to say that I love it. One cannot measure the satisfaction of squeezing the tool on a cinch ring until it’s so tight that the tool releases to let you know you’re done. This stuff installs fast and easy. The only concern I have is that it is water sitting in plastic (but so is my fresh water tank). Perhaps the water filter (see below) will help clear not only the water of chemicals, but my mind too.
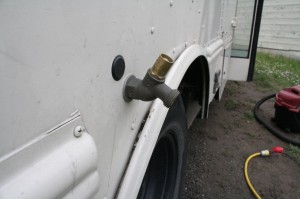
The drain for the water tank had to run out the side or bottom of the bus. With a failed attempt to drill through the side of the bus (due to some unknown internal metal supports in the wall), I ran the drain into the wheel well, and then across 6 inches to the side of the bus, where a spigot is mounted. It is one of the protected spigots that you have to have a water key to turn on. I carry one of these water keys, just as every nomad should. This is great because it not only acts as a drain to my tank, which I may need every once and a while, it also acts as an outside faucet for washing hands, tools, boots, etc. Perfect! AND, no one can mess with it or drain it unless they have a water key (don’t tell my secrets, okay?). The only concern I have here is that there is 6 inches of PEX exposed in the wheel well, which may burst due to freezing in a cold snap, which would immediately empty the contents of my 42 gallon tank onto the ground. I plan on insulating the short section and in long cold periods to just leave the drain dripping a bit.
Where the plumbing exits the tank it travels first through a mesh filter to help protect the pumps and plumbing up ahead. Then it makes its way through an on/off valve, which allows me to turn on and off the water coming from the tank if necessary for repairs or such. From here it runs to the sink cabinet where it changes from PEX to clear reinforced tubing rated for drinking water (from a marine supply store). This is because the first pump that the water goes through is a foot pump (Whale Gusher MK III – Xmas present from my mother) and it cannot accept PEX line – or at least I think it would break the plastic hose barbs that are integral to the unit. The foot pump was installed for if my house/solar battery bank was low, or more importantly, for stealthy sink usage while parked in neighborhoods. It also works awesome to keep water usage low. It is amazing how much less water you use when you have complete control over your water flow.
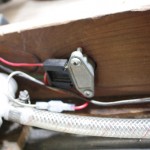
The line goes from the foot pump directly to the 12v water pump (MODEL??? – acquired for $20 new at a garage sale by a friend). This pump is wired to my solar battery bank. It has it’s own breaker in my breaker box, which also acts as an on/off switch. However – closer to the pump, close to the foot pump lever, in the middle of the sink cabinet by the floor – there is a on/off button which can be activated by kicking it. The switch was originally a bright headlight foot switch from my bus. Because this switch is originally made for the headlights, it ran through a relay to provide enough power to the headlights. It is this that makes me wonder if I should wire it this way to the pump, which draws XXX amps when it’s on. If the switch burns out, I can easily replace it with any late 70s to late 80s or early 90s dimmer switch for a few bucks at an auto wrecking yard.
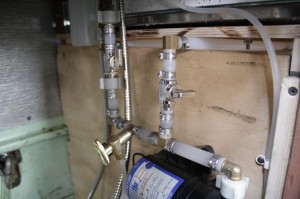
Coming out of electric pump, water splits and runs to hot H2O tank (running right) and to cold water side. Brass knob runs to water filter.
Out of the electric pump the line turns back to PEX. From here it splits two ways – one heads off in the direction of the coolant-heated hot water tank (which is not hooked up yet, and not addressed in this entry), and the other heads off to power the cold water side of the system. It splits again here – one side heading to an on/off switch that controls whether or not I want water to run to my water filter, and the other to an on/off switch that heads directly into the cold water side of the faucet. The water filter is an Aquasana (cost: $125 locally or $100 online). Usually the under-mount kit for this filter starts at $55. I rigged mine up super cheaply by dismantling the over-mount kit that came with the filter and buying a separate filtered-water-dispensing-faucet and other parts at a salvage store. Supposedly this filter is the finest for the price (both for the initial unit, as well as replacement cartridges – which are $50). Want to support the tea bus? Buy us a new filter every year!
Here’s where the benefit of the foot pump and the kick switch for the electric pump come in. While operating the sink one can leave the sink handle in the on position, turning the sink on and off with just your feet. This allows of easier control of water conservation. It will also be helpful when the hot water is hooked up, as one will be able to keep the temperature perfect without readjusting the sink handle every time the water is turned on. One downside is that the foot pump is not powerful enough to run the water filter very effectively.

Whole view of under sink compartment (side view - looking towards front of bus). Notice inline vent on upper left.
The sink drains immediately into a 90-degree elbow. I did this because I wanted to have as much space beneath the sink as possible for storage. Unfortunately they don’t make a 90 degree elbow for such a thing in the length I wanted, so I had to rig it together a couple times before I got it right. From the elbow, the drain goes back to the wall where it becomes a p-trap, that ends in a Tee. One end of the Tee goes upward to an inline vent. The p-trap’s main function is to keep stinking fumes from the drain plumbing from coming back up the drain. It does so by leaving some water in the sideways ‘S’ shaped pipe. In most houses there is a vent pipe that runs in the wall to allow air into the pipe after the p-trap. In places where there is no wall to run it in or no other practical place to run a vent pipe, people install an inline vent. This one-way vent allows air in, but not out. THIS PIECE OF PLUMBING IS EXTREMELY IMPORTANT IN A MOBILE APPLICATION. This is because we store our water in a tank under the bus. This tank can get nasty and stink, especially if exposed to heat and/or sunlight (which mine gets a little of both). If your p-trap isn’t leaving water in the pipe because you don’t have an inline vent, you WILL get stinky fumes coming up your drain.
On the other end of the tee that the drain and inline vent run into, the 1.5” drain line runs down through a hole in the floor, right into a 90-degree double hose barb, where it then runs straight across (slightly angled down) to a barbed fitting at the top of the grey water tank. The current drain for the tank is just a hose spigot, which I will attach a easy-connect attachment for a short length of garden hose to drain the tank with. As of now it takes over half an hour to drain the whole tank. There is a 1.5” NPT bung as well, which I will eventually plumb for a larger, faster, and easier drain – I have to wait until the WVO tanks are mounted before I can route the drain properly. I plan on keeping as much physical food and other matter from going down the drain, but we’ll see.
The grey-water tank is mounted under the center of the bus. I welded and painted a giant bracket out of used steel bed frame (angle iron), which creates a sort of bed for the water tank. Under the cross members of the bus I screwed wood to help cushion the top of the tank, as well as lower it a little over an inch to help it clear some parts of the underbody frame and brackets. In four places (one for each corner) I drilled through the wood and into the frame, placing all-thread through it with a lock nut and washer on top. The all thread comes straight down the whole height of the tank and through some short sections of steel square tubing that I welded to the side of my bed frame. Both the longer distance the all-thread goes through the wood/frame and the double contact point on the square tubing, allows for less shifting of the tank, and less stress on single points along the all-thread.
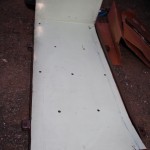
To help protect the tank, I took a single piece of the old aluminum sheet metal from my ceiling and cut it to the shape/size of the bottom and front of the tank. I bent this single piece to fit the tank (using a table, some scrap angle iron, clamps, and a mallet). I painted it and drilled a few holes in it to make sure water could drain if it got in between the tank and shield.
For a vent, I plumbed 1/2″ PEX from the top of the tank and ran it over to my wheel well, where I put in a 90 degree elbow and another short length of PEX upwards to the peak of the wheel well. This allows for the vent to be as high as possible to keep it from having water splash out of it while driving if the tank is full-ish.
Because the grey-water tank will only be filled with organic matter and biodegradable soap, it should be safe for anything from watering plants to dumping almost anywhere (which can be illegal some places, however). If needed, I plan on using bacteria/enzyme-based treatment to help with odors and/or to break down any matter that happens to make it down the drain.
In actuality, the installation was hard, crazy, and when I was finished, there were several leaks. I had to replace some of my thrown together parts with some new hardware store parts. Now, it seems to work fine, but I’ve only used it for a couple months. A leak in the water filter line fixed itself (weird how that works).
There are a few upgrades I will have to do. One: because the fresh water tank outlet is plumbed on the right side of the tank, when parked on a city street (which is always slanted towards the curb), I always have 5 gallons or more of water I cannot access when the tank is low. I plan on plumbing both the outlet and drain to the same bung on the left (passenger) side of the. This will also allow me to put in a shut off valve so I can open the drain on freezing nights so it wont freeze.
Two: Plumb the larger drain on the grey water tank.
I do have to say that having running water on board is AWESOME! It really makes the space feel much more complete. It’s easier to do things like washing hand and dishes. I no longer have to hang up a water bag on my side mirror and do those things outside, which in the winter is great – no more washing up in the rain and cold. However, as I was serving tea at Arts Alive in Eureka a couple days ago a thought came back to me – that I would love to still wash dishes outside sometimes in order to keep a connection to where I am, to switch it up a bit and talk to people who are outside. When I started serving tea it was off of the tailgate of a pickup truck on Hollywood Blvd with chairs and a rug. I truly appreciate having that connection with the surroundings and people just as much as I appreciate having an enclosed living room that one can step out of the surrounding world and be transported into a cozy nook.


